

🌹🌹如果您觉得我的文章对您有帮助的话,记得在GitHub上star一波哈🌹🌹
0 CountDownLatch的作用
CountDownLatch作为一个多线程间的同步工具,它允许一个或多个线程等待其他线程(可以是多个)完成工作后,再恢复执行。
就像下面这样:

1 从一个Demo说起
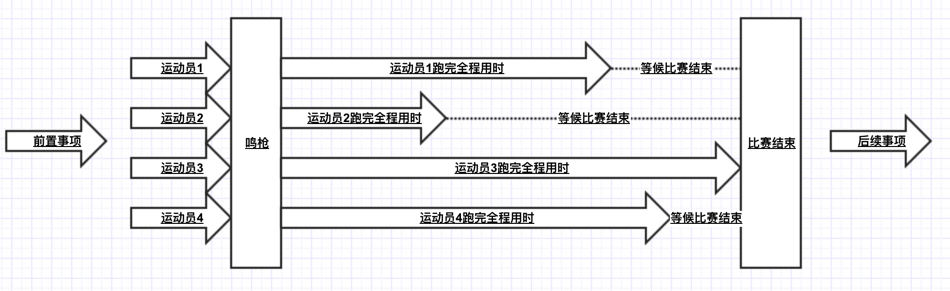
我们直接拿源码中给出的Demo看一下,源码中的这个demo可以看做模拟一个赛跑的场景。
赛跑肯定有跑得快的运动员也有跑的慢的运动员,每个运动员就表示一个线程。
运动员听到枪声后开始起跑,而最后一个运动员到达终点后,标志的比赛的结束。
整个过程如下图所示:
源码如下所示
public class Race {

    private static final int N = 4;

    public static void main(String[] args) throws InterruptedException {
        CountDownLatch startSignal = new CountDownLatch(1);  // 鸣枪开始信号
        CountDownLatch doneSignal = new CountDownLatch(N);   // 等待N个运动员都跑完后,比赛结束(结束信号)

        for (int i = 0; i < N; ++i) // N个运动员准备就绪,等待枪声
            new Thread(new Runner(startSignal, doneSignal, i)).start();

        Thread.sleep(1000); // 等待所有运动员就绪
        System.out.println("所有运动员就绪");
        startSignal.countDown();      // 鸣枪,开赛
        System.out.println("比赛进行中...");
        doneSignal.await();           // 等待N个运动员全部跑完(等待doneSignal变为0)
        System.out.println("比赛结束");
    }
}

class Runner implements Runnable {
    private final CountDownLatch startSignal;
    private final CountDownLatch doneSignal;
    private int number;

    Runner(CountDownLatch startSignal, CountDownLatch doneSignal, int number) {
        this.startSignal = startSignal;
        this.doneSignal = doneSignal;
        this.number = number;
    }
    public void run() {
        try {
            // 等待枪声(等待开始信号startSignal变为0)
            System.out.println(number + "号运动员准备就绪");
            startSignal.await();
            // 赛跑
            System.out.println(number + "号运动员跑步中...");
            Thread.sleep(new Random().nextInt(10) * 1000);
            // 此运动员跑到终点
            System.out.println(number + "号运动员到达终点");
            doneSignal.countDown();
        } catch (InterruptedException ex) {} // return;
    }
}
上面代码运行后,输出如下:
0号运动员准备就绪
3号运动员准备就绪
2号运动员准备就绪
1号运动员准备就绪
所有运动员就绪
比赛进行中...
0号运动员跑步中...
1号运动员跑步中...
2号运动员跑步中...
3号运动员跑步中...
2号运动员到达终点
1号运动员到达终点
0号运动员到达终点
3号运动员到达终点
比赛结束
下面,深入到代码细节,看一下CountDownLatch初始化、countDown方法、await方法是如何实现的。
2 CountDownLatch类图
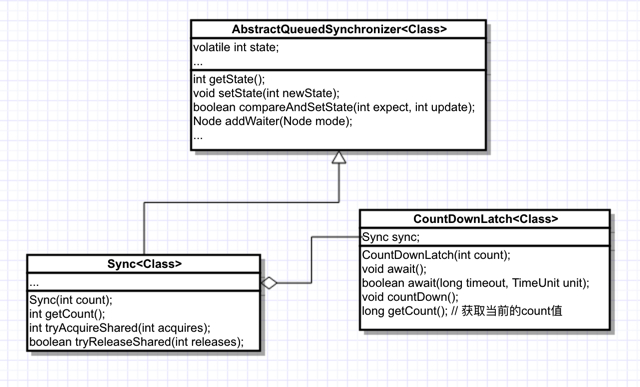
通过下图来了解一下CountDownLatch的类继承关系
3 CountDownLatch的初始化
CountDownLatch只有一个构造方法:
public CountDownLatch(int count) {
    if (count < 0) throw new IllegalArgumentException("count < 0");
    this.sync = new Sync(count);
}
他会初始化一个Sync,这是他的一个内部类,类似于ReentrantLock,Sync也继承于AbstractQueuedSynchronizer(AQS)。
AQS是个啥?可以参考笔者的另一篇文章:Java队列同步器(AQS)到底是怎么一回事
然后看一下Sync的源码
private static final class Sync extends AbstractQueuedSynchronizer {
    private static final long serialVersionUID = 4982264981922014374L;

    // 调用AQS的setState方法,将state赋值为count的值
    Sync(int count) {
        setState(count);
    }

    // 获取AQS state的当前值
    int getCount() {
        return getState();
    }

    protected int tryAcquireShared(int acquires) {
        return (getState() == 0) ? 1 : -1;
    }

    protected boolean tryReleaseShared(int releases) {
        // Decrement count; signal when transition to zero
        for (;;) {
            int c = getState();
            if (c == 0)
                return false;
            int nextc = c-1;
            if (compareAndSetState(c, nextc))
                return nextc == 0;
        }
    }
}
所以CountDownLatch的初始化,其实是将参数count的值赋值给AQS的state,依然是用state来控制同步状态。
4 await方法的实现
依然用上面赛跑的例子来说明这个问题。这里我们只考虑所有运动员等待枪声的情景。
回忆一下,赛跑的例子中,通过下面的方式创建了鸣枪信号:
CountDownLatch startSignal = new CountDownLatch(1); // 鸣枪开始信号
然后创建了N个线程(表示N个运动员),并调用其start方法让其开始执行(运动员准备就绪,等待鸣枪开跑)。
然后通过在run方法中调用startSignal.await(),来实现等待鸣枪的动作(其实就是等startSignal的值降为0)。
我们来看一下他是怎么await的。
public void await() throws InterruptedException {
    sync.acquireSharedInterruptibly(1);
}
调用了AQS的acquireSharedInterruptibly方法
public final void acquireSharedInterruptibly(int arg)
        throws InterruptedException {
    // 判断线程是否已经被中断
    if (Thread.interrupted())
        throw new InterruptedException();
    // 调用CountDownLatch.Sync的tryAcquireShared方法
    // 此方法判断count的值是否==0,如果==0,返回1,否则返回-1
    // 目前我们还没有执行countDown,所以count肯定不等于0,这里肯定返回-1
    // 所以会执行到AQS的doAcquireSharedInterruptibly方法中
    if (tryAcquireShared(arg) < 0)
        doAcquireSharedInterruptibly(arg);
}

protected int tryAcquireShared(int acquires) {
    return (getState() == 0) ? 1 : -1;
}
AQS.doAcquireSharedInterruptibly的实现如下
/**
 * Acquires in shared interruptible mode.
 * @param arg the acquire argument
 */
// 此方法会在count>0时将当前线程加入到等待队列中
// 由于我们目前还没有执行countDown,所以count会保持>0
// 启动的N个线程会全部加入到队列中
private void doAcquireSharedInterruptibly(int arg)
    throws InterruptedException {
    // 将当前线程添加到等待队列中(SHARED模式)
    final Node node = addWaiter(Node.SHARED);
    boolean failed = true;
    try {
        // 自旋获取同步状态
        for (;;) {
            final Node p = node.predecessor();
            if (p == head) {
                // 依然调用CountDownLatch.Sync的tryAcquireShared方法判断
                // 如果count降为0,退出自旋
                int r = tryAcquireShared(arg);
                if (r >= 0) {
                    setHeadAndPropagate(node, r);
                    p.next = null; // help GC
                    failed = false;
                    return;
                }
            }
            // 将node的waitStatus设置为-1(常量SIGNAL,表示需要唤醒),并阻塞
            if (shouldParkAfterFailedAcquire(p, node) &&
                parkAndCheckInterrupt())
                throw new InterruptedException();
        }
    } finally {
        if (failed)
            cancelAcquire(node);
    }
}
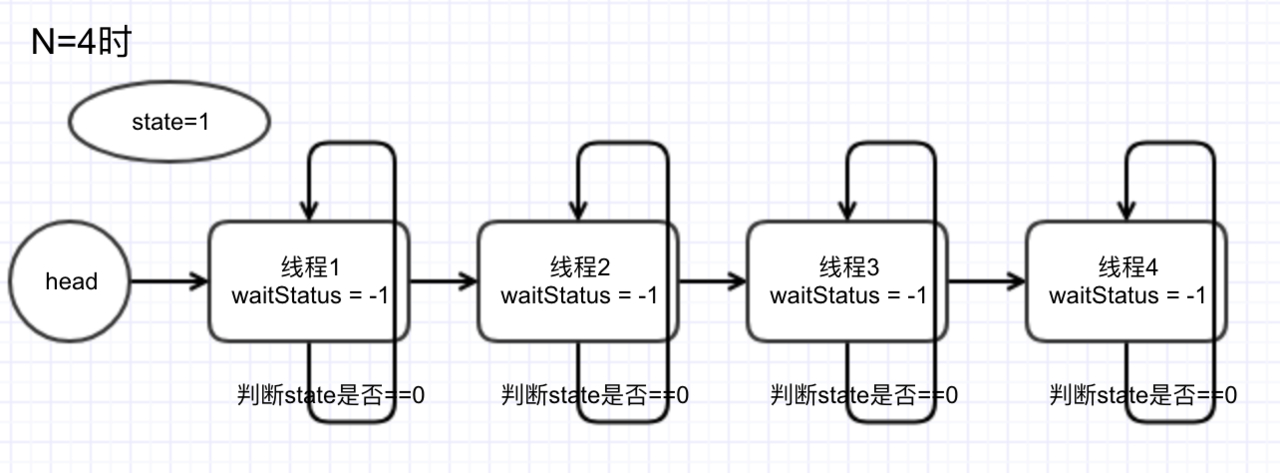
假设N=4,那么4个线程全部start后,会全部加入到队列中自旋等待,像下面这样:
5 countDown方法的实现
countDown方法实际上就是将AQS中的state的值-1。然后判断当前state的值是否==0,如果等于0,说明所有线程都执行结束了,需要唤醒所有等待的线程。
依然继续上面的场景,鸣枪后,所有的运动员开跑。
鸣枪这个动作实际上就是在主线程中执行:
startSignal.countDown();
这就相当于向刚才队列中的所有线程发了一个恢复执行的信号,所有线程会被唤醒,继续执行await后面的代码。
countDown具体干了啥呢?
public void countDown() {
    sync.releaseShared(1);
}
他会调用AQS的releaseShared方法
public final boolean releaseShared(int arg) {
    // 调用CountDownLatch.Sync的tryReleaseShared方法
    // 该方法尝试将count值-1,并判断-1后的count是否==0,如果==0,返回true,否则false
    // 该方法的源码已经在Sync的源码中给出,可翻阅上文查看
    if (tryReleaseShared(arg)) {
        doReleaseShared();
        return true;
    }
    return false;
}
由于startSignal中count的初始值==1,startSignal.countDown()后,count变为0。所以tryReleaseShared会返回true。
然后开始执行doReleaseShared,唤醒队列中的线程。
doReleaseShared是AQS中的方法。
/**
 * Release action for shared mode -- signals successor and ensures
 * propagation. (Note: For exclusive mode, release just amounts
 * to calling unparkSuccessor of head if it needs signal.)
 */
private void doReleaseShared() {
    /*
     * Ensure that a release propagates, even if there are other
     * in-progress acquires/releases.  This proceeds in the usual
     * way of trying to unparkSuccessor of head if it needs
     * signal. But if it does not, status is set to PROPAGATE to
     * ensure that upon release, propagation continues.
     * Additionally, we must loop in case a new node is added
     * while we are doing this. Also, unlike other uses of
     * unparkSuccessor, we need to know if CAS to reset status
     * fails, if so rechecking.
     */
    for (;;) {
        Node h = head;
        if (h != null && h != tail) {
            int ws = h.waitStatus;
            // Node.SIGNAL == -1
            // 由上文可知,进入队列的线程的waitStatus都等于-1
            // 所以这里为true
            if (ws == Node.SIGNAL) {
                // 尝试将waitStatus从-1改为0,如果修改成功,就恢复这个线程的执行状态
                if (!compareAndSetWaitStatus(h, Node.SIGNAL, 0))
                    continue;            // loop to recheck cases
                unparkSuccessor(h);
            }
            else if (ws == 0 &&
                     !compareAndSetWaitStatus(h, 0, Node.PROPAGATE))
                continue;                // loop on failed CAS
        }
        if (h == head)                   // loop if head changed
            break;
    }
}
这里,被阻塞的线程又恢复执行,恢复到哪了呢?就是刚才自旋等待的那里。
把上面的源码直接拿下来,再说明一下(注释部分)
private void doAcquireSharedInterruptibly(int arg)
    throws InterruptedException {
    // 将当前线程添加到等待队列中(SHARED模式)
    final Node node = addWaiter(Node.SHARED);
    boolean failed = true;
    try {
        // 线程被释放后,继续下一次循环
        for (;;) {
            final Node p = node.predecessor();
            if (p == head) {
                int r = tryAcquireShared(arg);
                // 获取头节点,从头结点开始释放,由于count已经降为0,所以r >= 0为true
                // 然后会将自己摘除当前队列,使下一个节点成为头节点
                // 等下一个节点也恢复过来后,同样执行上面的过程
                // 这样,队列中的所有线程就被释放了
                if (r >= 0) {
                    setHeadAndPropagate(node, r);
                    p.next = null; // help GC
                    failed = false;
                    return;
                }
            }
            // 将node的waitStatus设置为-1(常量SIGNAL,表示需要唤醒),并阻塞
            if (shouldParkAfterFailedAcquire(p, node) &&
                parkAndCheckInterrupt())
                throw new InterruptedException();
        }
    } finally {
        if (failed)
            cancelAcquire(node);
    }
}
6 总结
本文从源码层面详细说明了CountDownLatch是如何运作的。
CountDownLatch也是基于AQS实现,所以了解AQS的机制,对于理解本文至关重要。
其实,CountDownLatch最核心的就是通过控制AQS的state,来同步多个线程之间的状态。
标题:深入剖析线程同步工具CountDownLatch工作原理
作者:Lord-X
地址:http://blog.feathers.top/articles/2019/08/16/1565924569872.html